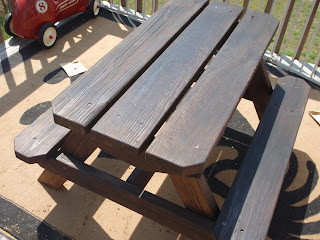
I built this small scale picnic table for my boys earlier in the week. I made it out of four year old wood the builder left in the lot next to us and plans from http://knockoffwood.blogspot.com/2010/03/plans-kids-picnic-table-you-can-build.html. The wood I had to work with wasn't exactly what they called for but I made the two pressure treated two by sixes and some small pieces of two by fours work. If you want to see more of that, it is on http://www.stresstheseams.blogspot.com/. It turned out pretty nice, but it just needed those finishing touches. No, I'm not painting it white and stenciling it.

Being the kind of guy I am, I wanted to go the cheap route. I found a can of red oak stain in the off color bin at the ole home despot for a dollar so it was on.
Not being much of a directions kind of a guy I just went for it. I flipped the table over so the top would be the last thing done, giving me fewer chances to mess it up. Sadly, I didn't have much booze in the house so I couldn't get into official painter mode, but I made do with sweet tea. My method wasn't the cleanest but it got the job done. I used a cheap chip brush and just went to town. The old wood drank down the stain, but I just kept slathering it on.
With the bottom done I flipped it to a good even coat on the top. Make sure you do this on something you don't care about. Getting in all the grooves will be messy, well it was for me at least. Being an outside table I put on an extra heavy coat just to make sure it was good and weather proof. Yeah, I made it out of pressure treated wood but I still don't trust it.
I would say it came out a little darker than I wanted, but I wasn't really sure what I wanted. Some may want to fill the screw holes for a more finished look. I was going for a more rustic look so I opted to just leave them.


7 comments:
Love all the details, this is one strong table! Thanks for sharing!
Thanks, yeah it's over built, but it was the free lumber I had on hand. Like most right now money is tight so using free or recycled stuff makes a project even better.
I found my way to your blog from Knock Off Wood. You did a great job on the table! I have the plans sitting on the table to work on in the next few weeks.
Love the corner details! This table looks like it will last forever. Nice work.
Thanks so much. Knock Off Wood's plans rock. The corner were cut off at a 45 degree with a miter saw to reduce the sharp edges. I also ran a router with a quarter round bit around everything to soften the edges.
This table is a beauty! Love the rustic look AND the price. No doubt that this table will be used by your grandkids!
Thanks that's exactly what I wanted. It makes me smile everytime I see my boys sitting at it.
Post a Comment