Sunday, May 23, 2010

Coat hanger top hat

IMG_0392 IMG_0393


       I sat down one evening with a bag full of old coat hangers with the idea to make an earring tree for the wife.  Something just led me astray.  I can’t really explain it.  Sometimes, I just start building to see what I end up with.

IMG_0377 I started by making two circles, one from the largest size hanger, and one from the smallest.  This is not the kind of project for measuring.  Just cut something and see where it fits.  I used a small pair of needle nose vise grips to make loops to attach the ends together.  I just used my hands to form a good enough circle. 


IMG_0378

IMG_0381


I took the parts from the hook on the hanger to the turn for the flat for my uprights between the two circles.  I made a loop on each end to attach to the circles.  Next I made rings out of some of the leftovers to hold the uprights like I wanted.  IMG_0380 I did this by wrapping it around a piece of tube.  It is easier if you clamp the wire so you only have the one end to worry about holding.  After wrapping I just unclamp the end and cut them apart with a pair of wire cutters.


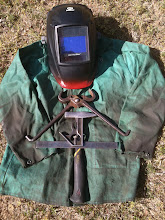
I wasn’t really sure about it once I really started to put it together.  IMG_0389I couldn’t keep it looking right.  I decided to add some more cross braces and clamp down on the attachment points some more.  I used a cross brace on the top to help support and give a hanging point.  I added four braces in the bottom section to hold the uprights equally apart.  Over all I’m happy with how it came out.  The best thing however is it actually fits my head.

Friday, May 14, 2010

Body by rebar


With my project list ever growing the wife decided to add yet another one to me.  She has a craft show coming up next month, and needs some display pieces.  The first thing she wants is a body double.  With a quick check of the mental list of free materials, the pile of rebar in the lot beside the house won the vote.  The idea that came to me was a triangular almost Blair Witch style body, just with depth. 

IMG_0369

The tool of choice tonight was a Miller, Millermatic 135 mig welder.  I’m using flux core wire in it so it’s more portable.  The trick to these “cricket welders”, as some call them, is to turn the volts wide open and adjust the wire to what works for you.  Mine was a little less then half way up for welding the rebar.  The only bad thing I found was that the tacks with the flux core wire are brittle, so the won’t bend or pull like normal. 

IMG_0371

IMG_0368


With some quick cutting and tacking I had the basic form.  I’m thinking of using wire to act as a filler, and give it the detail it needs.  I still need to make the hips, and as the wife informed me “make it female”.  Metal boobs it is.  I’m think I’ll try a rebar cone with a wire coiling out from the center.  Some things you never imagine having to design. 

Tuesday, May 11, 2010

Boxes from boxes

Yes, it seems slightly redundant to make a box out of a box, but what else are you going to do with those Chex boxes?  The wife needed a fancy looking box for something she had to ship out.  I figured if I can layout just about any fitting in metal a box would be no problem.  IMG_0357 I came across a Chex box, the large Sam’s version, in the recycling and decided to scavenge it for the cardboard.  I started by opening up all of the seams on the box to lay it flat.  I made a center line down the longest way to give me something to start the layout from.  It’s hard to give exact measurements when you’re working with repurposed material.  You never know exactly what size piece you might be working with.  I needed mine to be about an inch and a half deep and ten inches tall.  The width I determined be what I was able to get out of the piece.  For looks I made it taper in on each side.  IMG_0358
I started with laying out the bottom of the box in the center of the cardboard.  Then I measured out the ten inch sides off of each side of the bottom.  At this point I’m just basically making a mirror image on each side of the bottom.  Off the front of the box I made sides that are the same inch and a half with a half inch extra to attach it to the back.  On the top of the back I laid out the lid.  I added a sixteenth of in inch to the inch and a half so it would fit better around the box.  The thing you have to remember is to layout everything from the centerline.  If you keep everything symmetrical you’ll be okay.  IMG_0360  
IMG_0362I cut out the box with a pair of scissors.  Being that the Chex box was corrugated cardboard I decided to score the edges where they would be bent.  Doing this gave it much nicer and crisp edges.   When you score the bend marks make sure only to cut through the top layer and about half of the corrugated.  You don’t want to weaken the edge to much.  Once the bend marks are scored it was pretty easy to form up.  I used a masking tape to put the box together and was quite happy with the results.  The wife wanted to wrap it to I left her to that.  IMG_0366            
     IMG_0365

Thursday, May 6, 2010

Business Card Holder

Today was another day where something had to be built.  I ventured into the basement and came out with a bucket of random metal bits.   IMG_0327It was mostly old cheep tools.  My wife calls me a tool snob.  If it’s made in China, or the like, I won’t use it.  In my job my life regularly depends on my tools, so I use the best.  So, that begs the question, what do you do with all of the gifted or oddly acquired cheep stuff?  Simple, use it as material.  Rummaging through the bucket I came across some old wrenches, a knock off crescent wrench, a spare tire holder for a Z31 Nissan and a skeleton key.

IMG_0329   I used a hammer and a cement block to put a small radius into the wrenches.  The plan was to weld them into the base for the crescent wrench.  The spare holder looked like a piece of channel so I welded it to the crescent wrench to support the cards.  IMG_0330


I needed a platform for the cards. So, I took two of the other wrenches and crossed them to make the support.  This seemed to work well , but it just needed more.

2010 April Blog 036  

The final touch was the skeleton key to hold down the cards.  I welded a lock washer to the top of the spare holder to hold the key on, yet let is swivel.  Even set up outside in the wind the cards will right where you want them. 

Monday, May 3, 2010

Bicycle returns

After looking everything over on the bike I decided to tear down the wheels to refinish them.  I figured I would start with the back wheel.  The rim was pretty rusty, and the gears were not much better.  The bike was outside for a while before I save it. 

IMG_0305IMG_0307

I ran into more problems than I though I would trying to break down the wheel.  Turns out that you need special tool that are only good for taking apart bike wheels.  I have a rule in my house, no unitaskers.  I’m not going to have random tool laying around that I never use but once in a blue moon.  To remove the spokes they say you need a spoke wrench.  I took mine off with a flat tip screw driver from the inside.  Just be careful the brass is soft and easy to mess up.  To remove the gears you need yet another special wrench.  I’m thinking I can remove it with a hammer and screw driver, but the rust has beaten me for this evening.  I gave it a good spray of WD-40, and I’ll hit it with some more tomorrow.  Now I just have to figure out if it is reversed threaded or not.  Learning as you go can be entertaining. 

IMG_0325

Saturday, May 1, 2010

Different corbel idea


So the wife asked me if I could make her a "bookshelf".  I think I took the meaning a little to literally, no pun intended.  The plan was to make two channels to bolt three books together as corbels for a shelf.  It seemed easy enough, boy was I wrong.  First mistake I made was drilling the hole in the book without it being clamped down. The book went from an inch and a half thick to about four inches.  With a new book and a clamp it went much better, but a drill press would have made assembly later much nicer.  The idea with the channels was to have two bolts in the legs to support the books and one in the center to attach it to the wall.  The only thing I didn't like about the set up was having to assemble it on the wall, but it was doable.

Bolting the books together was more challenging than I thought it would be.   Books aren't solid. They move in ways that can annoy you more than help you.  Like most people, I've seen lots of movies with hollows carved out of books, guns in bibles, and the like. So I assumed it would be a cake walk to notch these for the bolts and channels.  Yes, I was wrong again.  Three razorblades later, it was done. Not pretty, mind you, but no one will see it anyways.  Once I had everything together for the test, it seemed pretty stable. But I think I'm still going to glue the books closed once it's mounted.   
So the support is done, now only to figure out how to make the shelf out of books. Any thoughts?